
Big Walk Warehouse Puzzle
A split-route icon communication guide for the waterside warehouse.
Table of contents
Quick answer: send one player through each warehouse door, close both routes, pass through the turnstiles, then relay the icon order shown in the current attempt one position at a time. The Purple Blob is the completion check.
Confirm the correct warehouse before splitting
This puzzle is the dark twin-building warehouse on a ledge between the water and the central mountains. Open the interactive map, enable Puzzles, and select Warehouse Puzzle before assigning sides.
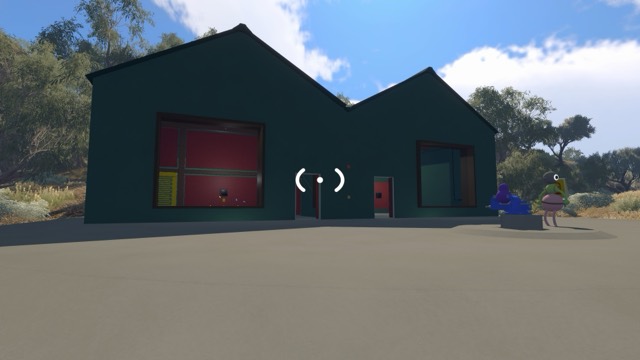
Big Walk has another warehouse with an almost identical facade. Use the location, mechanic, and reward—not the wall colour—to tell them apart.
| Check | Warehouse on this page | Large Warehouse |
|---|---|---|
| Where | Ledge between the water and central mountains | Open ground between two stream sections |
| Communication task | Relay the current icon order after the doors and turnstiles | Relay a symbol order with distinct poses |
| Recorded reward | Purple Blob | Red Blob |
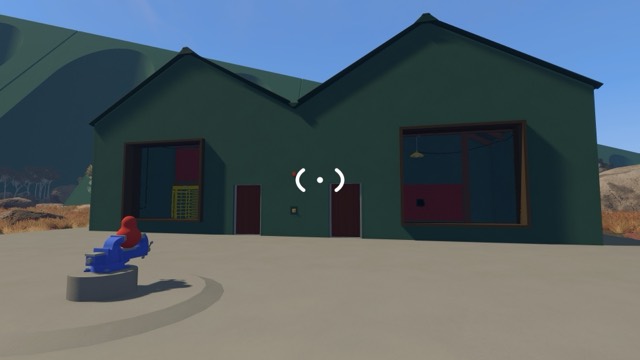
If the surroundings match the second image, switch to the Large Warehouse guide before attempting the symbol sequence.
Build the split plan before the doors close
The confirmed route uses both doors, closes them, and then sends the two sides through the turnstiles. Prepare the communication protocol first so the group is not inventing names after it has separated.
- Reader: owns the visible source order and calls one position at a time.
- Operator: repeats each call and makes the matching input.
- Checker, if available: listens for a reversed viewpoint, skipped position, or changed nickname.
These are guide shorthand, not in-game classes. With two players, use one Reader and one Operator. With three or more, keep one voice authoritative on each side rather than having several people call competing sequences.
Fix one viewpoint and icon dictionary
Before crossing, agree on two rules:
- Number positions from one named direction, such as the Reader's left to right.
- Give every visible icon a short shape-based nickname both sides can repeat.
Always say the position before the nickname: “position three, [shared nickname].” That bracketed phrase is a format example, not a real answer. The players who can see the current room must create the actual names.
Phase 1 — use both doors and close them
- Place one primary player at each warehouse door.
- Confirm that the Reader and Operator know which side they own.
- Send both players through their separate doors.
- Close both routes as the puzzle requires.
- Do not begin the icon callout until both players confirm this stage is complete.
Sending the whole group through one entrance does not satisfy the documented two-door setup. The exterior image shows the paired building, but it does not prove the state of either door inside your attempt.
Phase 2 — pass the turnstiles without changing roles
Continue through the turnstiles after the doors are closed. Keep the Reader and Operator assignments unchanged while crossing so neither side starts describing the wrong station.
The exact door animation, turnstile lock state, and reset effect have not been captured. Treat only the controls and state visible in the current world as authoritative; do not add an extra input because another group remembers one.
Phase 3 — relay the current icon order
- The Reader calls the first numbered position and its agreed icon nickname.
- The Operator repeats both pieces of information before acting.
- The Reader confirms the repeat-back.
- The Operator makes the matching input.
- Pause, then move to the next position in the same direction.
- Continue until the reward state changes.
One-at-a-time calls are slower than shouting the entire order, but they expose the exact position where the two sides disagree. If the room presents a new order, discard the old notes and read the current attempt.
Confirm the solve with the Purple Blob
The Purple Blob becoming available is the reliable completion signal. Passing both doors or reaching the far side of the turnstiles only proves the setup; neither action proves that the icon order was entered correctly.
No universal icon code, permanent sequence, or fixed number of positions has been verified. A solution copied from another selected world may not describe the room in front of you.
Recover from the first uncertain stage
| What went wrong | First check | Recovery |
|---|---|---|
| No one reached the icon relay | One player may have used the wrong entrance | Regroup outside and restage one primary player at each door |
| The split looks incomplete | A door or turnstile stage may have been skipped | Recheck both closed routes, then follow the visible turnstile path |
| The order fails partway through | Reader and Operator may be using opposite viewpoints | Restate the numbering direction and resume from the first uncertain position |
| Two people call different shapes | The team changed icon nicknames mid-sequence | Return to one Reader, one Operator, and one shared dictionary |
| A copied sequence fails immediately | The current room may show a different order | Re-read the current attempt instead of retrying stale notes |
If the room visibly returns to its starting state, rebuild the position list from that state. The exact reset animation and every 2-, 3-, and 4+-player variation remain unverified, so this guide does not promise that partial input survives a reset.
What the available images do not prove
The two licensed scene images above are identification aids. They distinguish the two warehouse locations, but they do not show the interior icon order, input count, reset animation, or a completed reward state. Those details must come from the live puzzle in the selected world.
Continue the Purple Blob route
Use all Purple Blob puzzles to choose the next reward route, or review Puzzle Teamwork for a common symbol-callout protocol.
Related guides
Big Walk Purple Blob Puzzles — All 7 Locations
Find and solve the seven mapped Purple Blob challenges: golf, two icon routes, sound matching, a timer course, light relay, and patience.
Read guideBig Walk Interactive Map — 230 Locations & Puzzles
Search 230 Big Walk locations on a terrain map, isolate all 45 puzzles, inspect solution cues and screenshots, track found markers, and open related wiki guides.
Read guideBig Walk Puzzle Teamwork
Choose a 2, 3, or 4+ world, divide observation jobs, and use in-game communication limits as part of the puzzle.
Read guide