
Big Walk Beach House Icon Puzzle
A concise split-side icon-order guide for the red house above the shore.
Table of contents
Quick answer: staff both routes, pass through both turnstiles, then keep one player with the current icon order and one player at the back-porch interaction. Call one position at a time, repeat it back, and follow the controls visible in your world until the puzzle releases its Purple Blob.
Understand the two-side puzzle
The house separates the information from the player who must use it. The group must go through both turnstiles, then communicate the icon order from one side to the other player on the back porch. Simply reaching the porch is setup, not the completion state.
There is no verified permanent icon code. Treat every visible sequence as the answer for that attempt and world, not as something to copy from a screenshot.
Find the red house above the shore
Look for the small red house on a ledge over the shore. Open the interactive map, enable Puzzles, and select Beach House Icon Puzzle if the coast and surrounding paths make the ledge hard to approach.
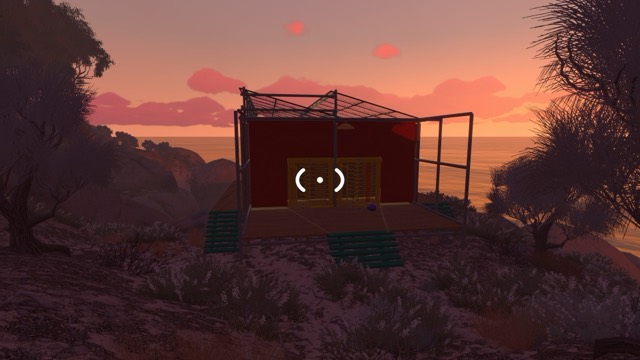
The symbol visible on this exterior image is a location cue, not a reusable solution. Walk around the structure and identify both playable routes before anyone commits to a side.
Assign the two roles before crossing
- Observer: stays with the current icon information and calls each position.
- Porch Operator: reaches the back-porch interaction, repeats every call, and acts only after both players agree.
- Checker, if available: listens for reversed positions, skipped calls, or two different nicknames for the same shape.
These names are guide shorthand, not classes shown by the game. Do not decide which turnstile belongs to which role in advance; cross first, inspect the information available on each side, and then keep the roles stable.
Build a shared icon language
Before using the porch controls, agree on three things:
- Freeze the Observer's viewpoint so the order does not reverse mid-call.
- Number the visible positions from one declared direction.
- Give each displayed icon a short shape nickname that both players understand.
Use the same sentence pattern for every call: position first, icon second. For example, “position two, [our nickname]” demonstrates the format without pretending that the bracketed words are a real puzzle answer.
Pass through both turnstiles
- Put one primary player at each route instead of sending the whole party to the same entrance.
- Confirm that both players remember the numbering direction and nickname rule before crossing.
- Pass through both turnstiles.
- Identify which player can read the current order and which player has the back-porch interaction.
- Keep the Observer and Porch Operator on those sides for the attempt.
The available capture only shows the front exterior. Follow the actual paths and interaction prompts in your selected world rather than using the image as a turn-by-turn route diagram.
Relay the current icon order
- The Observer calls the first position and its icon nickname.
- The Porch Operator repeats both pieces of information without acting.
- The Observer confirms the repeat or corrects it.
- The Porch Operator uses the matching visible porch interaction once.
- Both players pause and read the current room state before the next call.
- Continue in position order until the Purple Blob becomes available.
One-position calls may feel slower than shouting the whole sequence, but they make a reversed viewpoint, skipped slot, or misunderstood icon easy to locate.
Confirm the solve
Use the released Purple Blob as the completion check. Passing both turnstiles, reaching the back porch, or entering part of the order does not by itself prove the puzzle is complete.
No exact porch-control type, fixed icon count, universal sequence, or reset animation has been verified for every world. The controls and icon positions on the current screen take priority over any number implied elsewhere.
Recover from an uncertain position
If the reward does not appear:
- Stop all porch actions and name the last position both players confirmed.
- Check whether the Observer changed viewpoint or the two players numbered in opposite directions.
- Compare the first uncertain position and its icon nickname.
- Resume from the room's current visible state if it clearly preserves the attempt.
- If the room visibly resets, rebuild the position list from that new state before trying again.
Do not invent a hidden reset step when the room does not show one. Re-read the visible state and use only the controls the selected world actually exposes.
Account for world size
The host chooses a 2-player, 3-player, or 4+-player world, and some things can change with that choice. Two players can cover the core Observer and Porch Operator roles; extra players are most useful as checkers beside one of those roles.
The exact icon count and control layout for every world size have not been captured. Keep the same callout method, but adapt it to the positions and interactions visible in your session.
Continue the Purple Blob route
Return to all Purple Blob puzzles to choose the next reward, or use Puzzle Teamwork for a reusable symbol-callout and repeat-back method.
Related guides
Big Walk Purple Blob Puzzles — All 7 Locations
Find and solve the seven mapped Purple Blob challenges: golf, two icon routes, sound matching, a timer course, light relay, and patience.
Read guideBig Walk Interactive Map — 230 Locations & Puzzles
Search 230 Big Walk locations on a terrain map, isolate all 45 puzzles, inspect solution cues and screenshots, track found markers, and open related wiki guides.
Read guideBig Walk Puzzle Teamwork
Choose a 2, 3, or 4+ world, divide observation jobs, and use in-game communication limits as part of the puzzle.
Read guide